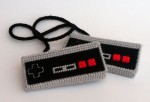
I was digging through some of my craft supplies and came across these Nintendo Game Controllers that I made last winter. This is entirely made of plastic canvas and cheap yarn. This was a fun project that kept me occupied for several nights. I needed a project that I could do in the living room while my son watched his 80th episode of Barney.
I had the bright idea of making some Nintendo game controllers with plastic canvas. It had no real purpose other than giving me something to do. Hell, I don’t even know what I’ll do with it now that it’s made, which is why it was in the box to begin with.
I’ve never worked with plastic canvas before. As with any craft, there’s a lot more to it than meets the eye. The trick is to do the stitching correctly so the plastic doesn’t show through. Ideally, the stitch would look good on both sides of the canvas. I found a number great tutorials on YouTube to teach me the basics. The project didn’t call for anything fancy, so I just used a basic stitch with some whip stitches to join elements. I don’t have a very detailed tutorial since I made it up as I went along. But this should give you a general idea it all came together.
Sizing It Up
I took my existing Nintendo game controlers to get the dimentions. I didn’t measure, rather I simply placed the canvas over the controlers to find the size and cut them out. After I got the pieces for one game controller, I used those pieces to cut my next set.
I also cut 2 layers for the A & B (red) buttons and two layers for the directional controls. I intentionally left the A & B buttons square. I think they look better.
Build It Up
I wanted the buttons to sit proud of the canvas, as if it would in real life.
Overlaying the canvas on the controlers, I found the location for the A & B (red) buttons and stitched those on top of the canvas in red using a whip stitch around the edges and a X stitch in the center.
I did the same for the directional buttons; whip stitch around the edges, and X stitch to fill the center.
I then found the location for the Select and Start buttons (black buttons in the middle) and did a X stitch. Since I’ll be using a basic diaganal stitch to fill in color, this X stitich will sit slightly proud of the other stitches.
Stitch It Up
I filled in the black areas with a basic diaganal stitch. I then stitched the gray areas with a diaganal stitch and did a simple running stitch around the directional controls.
The edges were pretty much the same. I did a diagnanal stitch to fill in the color, paying attention to keep the stitces facing the same direction so when it’s assembled, it doesn’t look wierd.
The top was done a bit different, though. It needed to have a cord.
Braid It Up
I wanted to have a cord to coneect the two controllers. I found this cool tutorial on how to make a cord using a braiding disk. I used black yarn and threaded it through the canvas as my anchor. Then I proceeded to use the braiding disk. This was a lot of fun and really easy to do. Once I got to the proper length, I threaded the yarn through the other top (for the other controller). Then I finished stitching the gray on the tops. In the end, the cord really blended into the top pretty well.
Whip It Up
Now it’s time to assemble the pieces. Then it was a matter of using a whip stitch with gray to attatch the edges to give it some shape. It got tricky closing the box, but I eventually got it. In hindsight, I wish I put some sort of support material like foam inside the controllers so they keep their shape a bit better. Right now, they look fine, but the edges can get squashed a bit and look a little skewed.
There you have it. Nintendo game controlers with plastic canvas. It serves no real purpose other than saving me from Barney’s neverending singing and providing me a way to embrace my geekyness. What do you do with it? I don’t know. I suppose you can hang these from the wall, on a peg or even from a rear-view window. This was a fun distraction. Maybe someday I’ll try something different with plastic canvas. But the right project will have to come along first.


[…] on. $5.50 later and I’m hooked up to do my project. (Indecently, I decided to do a NES gaming controller for my first plastic canvas project as opposed to a 8-bit […]