Top

Tag Archives | beer

Testing Ephrem’s Original Bottle Cutter Kit

I wanted to get into bottle cutting.  I have a few ideas of some cool projects.  I tried making my own jig, but had poor results.  I decided it would be better to buy a cutting jig that produced great results every time.  I looked online and found Ephrem’s Original Bottle Cutter Kit.  The kit was really reasonably priced, so I bought it.  In this episode, we open up the box and give it a try.


Category: Craft, Videos

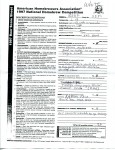
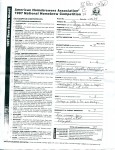
Montana Fair Homebrew Competition Results

Last Sunday, I went back to Montana Fair too get my feedback on the beer I submitted for the homebrew competition.  As far as placing, here are my results:

  • Lawnmower Man (Cream Ale):  White Ribbon (3rd) – Against 2 other entries.
  • Dishwater Wheat (American Wheat):  Red Ribbon (2nd) – Up against 1 other entry (nobody placing 1st?  Strange.)
  • Zuul Drool (Brown Ale):  White Ribbon (3rd) – Against 2 other entries.

It was neat to win a ribbon.  But then again, I wasn’t up against many others in any one category/style.  So I can keep the ego in check.  What I was really interested in is the feedback.  The judges used the AHA standards when judging the beer, however, I don’t think this was an official AHA event.  I’m not even sure if the judges were AHA certified judges.  But I’m certain that these judges know beer better than I do, and I’m definitely interested in what they have to say.

After I got the results, few guys from work and I opened a couple bottles of each to see if we can taste what they’re tasting.  So, following the judges feedback, I’ve also included my own comments.

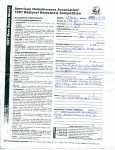
Lawnmower Man (Cream Ale)

  • Bottle Inspection:
    • Yes.  Good
    • Yes.  Good.
  • Bouquet/Aroma:
    • 10/10 – Faint malt notes.  No hops aroma.  Well balanced.
    • 6/10 – Faint maltyness.  Good to style.  No hops.  Right on veggie smell.
  • Appearance:
    • 2/6 – Far too dark for style.  Style must be sparkling clear.  Fair head retention, true to style.
    • 2/6 – Color too dark.  Should be straw to pale gold.  Cloudy.  Should be sparkling clear.
  • Flavor:
    • 10/19 – DMS flavor is very present.  Style allows some but this is too much.  Balance is decent.
    • 8/19 – Tastes very veggie flavor.  Canned corn (DMS)
  • Body:
    • 3/5 – Thin style.  Decent for style.
    • 5/5 – Right on thin.  Could be med body.
  • Drinkability & Overall Impression:
    • 6/10 – Not Enjoyable.  Too much DMS flavor present.  Aroma is true to style.
    • 4/10 – Not very drinkable to my tastes.
  • Total/Score Guide:
    • 31 – Very Good (30-39).  Exemplifies style well, requires some attention.
    • 25 – Good (20-24).  Exemplifies style satisfactorily, but requires attention.
My Comments:

This is an older beer, but it should still be good at this point (even for a light beer).  I think I brewed it in May.  After tasting, I do taste a vegetable taste.  The color is admittedly way off.  This recipe has unusual malts for a Cream Ale, which made it darker.  The beer is very cloudy, mostly due to yeast sediment.  I think this was before I was using Wirlflock.  This beer did not age well.

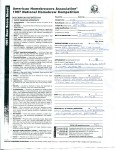
Dishwater Wheat (American Wheat)

  • Bottle Inspection:
    • Good.
    • Clean & clear.
  • Bouquet/Aroma:
    • 8/10 – Rye Evident
    • 8/10 – Nice bouquet for the style.  Slightly cloved and appropriate in tolerance for style.
  • Appearance:
    • 4/6 – Color good.  Slightly cloudy (Rye or chill haze?)
    • 5/6 – Color good to style.  Blond & Clear.  Pleasant.
  • Flavor:
    • 15/19 – Somewhat estery.  Rye and hops evident, but not over.
    • 14/19 – Good flavor.  Mouthfeel is a little low on carbonation.
  • Body:
    • 3/5 – Perhaps a little lite on body.
    • 4/5 – Body is correct to style.
  • Drinkability & Overall Impression:
    • 7/10 – Nice summer beer.  Very good effort.  Enjoyable.
    • 9/10 – Good summertime quencher.  Enjoyable overall.  Pleasant.
  • Total/Score Guide:
    • 37/50 – Very Good (30-39).  Exemplifies style well, requires some attention.
    • 40/50 – Excellent (40-50) Exceptionally exemplifies style.  Requires little or no attention.
My Comments:

This one is kinda interesting.  First, the judge tasted Rye, which isn’t present at all.  This is an American Wheat.  One said it was cloudy and the other said it was clear.  I actually like it a bit cloudy (hence the name, Dishwater Wheat), which is appropriate for a wheat beer.

One judge said it was estery, which I might have to agree with.  While wheat beers do have a hint of fruit, I used a clean ale yeast, so this should be pretty minimal.  I’m guessing it fermented too warm (68 degrees ambient, so fermentation could be as high as 72).

One said it was a little light on the body, which I might agree with.  The other said it was on-style.  Next time I’ll try to boost the body a bit.  I also want to increase the haziness.  I really like the color and the association of dirty water for this beer.  Call me strange, but it has a really neat look.

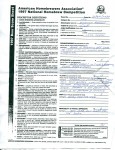
Zuul Drool (Northern Brown Ale)

  • Bottle Inspection:
    • Good.  Clean
    • Good.
  • Bouquet/Aroma:
    • 5/10 – Aroma is slightly off style.  Too light with not enough malt character.
    • 7/10 – Aroma OK.
  • Appearance:
    • 5/6 – Head correct in style & appearance.  Color good & clean.
    • 4/6 – Good color for Northern Brown.  Good retention & color head.
  • Flavor:
    • 12/19 – Flavor is pleasant at first, but disappears leaving a severe bitter aftertaste not common to style.  Balance is not present as malt is prevalent at beginning [handwriting is unreadable…guessing its beginning].
    • 12/19 – Some kind of aftertaste that detracts from overall enjoyment.
  • Body:
    • 3/5 – Body thin for style
    • 2/5 – Thin body.
  • Drinkability & Overall Impression:
    • 6/10 – Not bad, but weak for the style.
    • 7/10 – Quite drinkable, but needs work.  Slightly oxidized.  Try to be a little more careful when bottling.
  • Total/Score Guide:
    • 31/50 – Very Good (30-39).  Exemplifies style well, requires some attention.
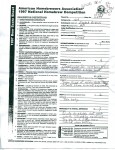
    • 32/50 – Very Good (30-39).  Exemplifies style well, requires some attention.
My Comments:

These responses I’ll have to agree with.  I was never very happy with this recipe.  My first Zuul Drool (all extract) was much more enjoyable.  I felt this was thin with a bitter aftertaste.  The malt really wasn’t there to back up the coffee flavor (which I’m attributing to the bitterness they’re tasting).  The beer looked the look, but didn’t deliver in taste.  They also mention it was a bit oxidized.  I think I can taste that now they pointed it out.  I’m not sure where the oxidization would happen, though.  My bottling and racking procedures seems to be proper.  This one is a mystery to me.

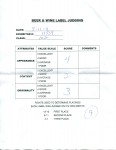
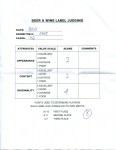
Zuul Drool Label

  • Beer Label Contest Entry Appearance:
    • 4/5
    • 2/5
  • Content:
    • 2/5
    • 2/5
  • Originality:
    • 3/5
    • 4/5
My Comments:  I really enjoy coming up with names and labels for my beer.  I normally use only a 1×2 5/8″ label on my beer.  Since I’m pretty decent at Photoshop, I can whip up a quick illustration/logo and include info such as AVB, IBU, hops used, brewing date, and bottling date.  While I go a little further with “branding” my beer, I don’t spend too much time designing a label (about 1/2 hour or less).  So, considering the effort I put into the label, I pretty happy with the results of the label contest.
Category: Home Brewing

Montana Fair Homebrew Competition

I heard this nasty rumor that Montana Fair has a beer competition.  Naturally, I had to look it up.  This was the first time I’ve entered anything at my local fair, so I was pretty excited.  I checked the entry deadlines for entering my beers.  Fortunately, the day I looked it up was the only day I had to enter.  So I scrambled to put together my entry forms.  On my lunch hour, I raced home and grabbed my beer and headed to the fairgrounds.  The check-in process was a bit lenghty.  Not because of lines, but mostly because was confusion on how to register beer for the competition.  The fair competitions is mostly preserved foods, pies, and bread.  I can’t give them too much grief, though.  These were mostly retired volunteers.

Beer Label Contest EntryI entered 3 beer total;  Lawnmower Man Cream Ale, Dishwater American Wheat, and Zuul Drool Brown Ale.  They also had a beer label competition.  So I reformatted my Zuul Drool label to fit on a larger 3×4″ label (I normally use 1×2.5″ labels).

I didn’t have high hopes for these beers.  None of them are great examples of their styles.  Zuul Drool wasn’t as good as my first brown ale, so I”m kinda so-so on that.  My Dishwater Wheat is awesome, but the color is too light (on purpose).  The Lawnmower Man had a lot more unusual ingredients (biscuit malt and honey malt specifically) which made it darker and a bit fuller of a flavor than a traditional cream ale.  But I thought it would be fun to enter them anyway.

I took my family to the fair for some rides, games, and exhibit browsing.  Naturally, I had to check in on my beers to see how they did.  My American Wheat got a red ribbon (2nd place). My Brown Ale got a red ribbon (3nd place).  The Cream Ale got a white ribbon (3rd place).  And   Finally, my Zuul Drool beer label got a red ribbon (2nd place).

While I’m pleased with the results, the ribbons are the least of my interest.  What I’m really interested is in the comments and feedback I get back from these beers.  These beers were graded on AHA standards (although I’m not sure if this was an official AHA competition).  I’m really anxious to see the feedback from the judges who have a much better palette than I do.

I’ll update this post when I get my results back.

I’m already looking forward to next year’s fair.  Not only will I enter beers specifically for the beer competition, but I’ll also enter  other projects.  I have plenty of scroll saw and woodturning projects.  Heck, I might even enter some photography or paintings.  It’s not so much the competition that excites me, but the audience I have access too.  That’s pretty cool.

Category: Home Brewing

Rogue Demon Hunter

Rogue Demon Hunter LabelI spent a semester in London on a study abroad program when I was in college. One of the things I loved most about Englad was their pubs. It is so different than American bars, I wish I could put into words. Its just something you have to experience. I spent many afternoons and evenings at the local pubs throwing back a few pints with good friends. So I was pretty excited to brew this version of a standard English Bitter.

I’m calling this brew my Rogue Demon Hunter.  This is an reference to a character in the Angel series (a spinoff of Buffy The Vampire Slayer).  In the show, Wesley Wyndam-Pryce is a proper English gentleman who worked for the Watcher’s Council (they train the current slayer and monitor demon activity).  Unfortunately, he got fired, so he went “rogue.”  Armed with a cross bow and a Harley, he scoured the streets of Los Angeles killing demons as a self-proclaimed “Rogue Demon Hunter.”  But his chosen image and title contradicts his mild mannered and awkward persona.  So while this beer has a bad-ass image, this mild mannered English ale is more suited for a civilized gentleman.

The recipe is based on one from Northern Brewer. I adjusted the hops to account for the higher alpha acid. My local brewstore didn’t have London Ale Yeast, so I swapped it with Danstar Noddingham yeast instead. I used a Brew In A Bag (BIAB) method for my mash. Everything went according to plan and I’m really happy with the results. While I was brewing this batch, I turned on the video camera to capture my process of brewing this beer. Check it out if you’re interested in this brew, or my brewing process.

BeerTools Pro Color GraphicRogue Demon Hunter
Style: 8-A Standard/Ordinary Bitter
Type: Brew In A Bag (BIAB)
Batch: #9
Size: 5.0 gal
Calories: 127.9 kcal per 12.0 fl oz
 

Original Gravity: 1.039 (1.032 – 1.040)

|=====================#==========|

Terminal Gravity: 1.010 (1.007 – 1.011)

|==================#=============|

Color: 11.2 (4.0 – 14.0)

|===================#============|

Alcohol: 3.79% (3.2% – 3.8%)

|=======================#========|

Bitterness: 32.9 (25.0 – 35.0)

|====================#===========|

Ingredients:

  • 6 lb Maris Otter
  • .5 lb Crystal Malt 60°L
  • .5 lb Cara-Pils® Malt
  • .25 lb Belgian Biscuit
  • .75 oz East Kent Goldings (6.7%) – added during boil, boiled 60 min
  • .5 oz East Kent Goldings (6.7%) – added during boil, boiled 30 min
  • .5 oz East Kent Goldings (6.7%) – added during boil, boiled 10 min
  • 1 ea Danstar Nottingham

Schedule:

  • Mash In (BIAB)Liquor: 4.0 gal; Strike: 159.13 °F; Target: 152 °F
  • RestRest: 60 min; Final: 152.0 °F

Notes:

  • Brew In A Bag (BIAB)
  • Based on a recipe from Northern Brewer
  • Target Mash at 152° F – Actual 151° F
  • OG spot on at 1.039
  • Schedule way off.  38 days of fermenting.  About 3 weeks primary, 2.5 weeks in second
  • Bottled on: 9/6/2011
  • FG at 1.014 – 3.2% AVB
  • I got 48 bottles exactly.  I’ve never got an even number of bottles!

Category: Home Brewing

How To Build a Wort Chiller

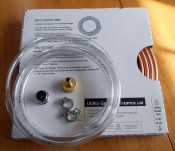
Wort chiller is a quick and easy project.My next tool in my home brewing arsenal is a wort chiller.  Since I’ve stepped up to a full wort boil, ice baths just won’t cut it anymore.  I need a way to cool down my wort quickly.  I could buy a commercial wort chiller, but a quick trip to the big box store will only cost you about $32.  The wort chiller is very easy to make.  Here’s what you need:

  • 20 ft. of 3/8″ OD Copper Coil
  • 10 ft. 3/8″ ID Vinyl Tubing
  • #4 Hose Clamp (2)
  • 3/4 FH x 3/8 Barb – Hose Barb Adapter (Female water hose connection)
  • Faucet to Garden Hose adapter (optional)

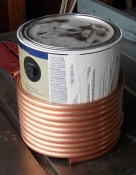
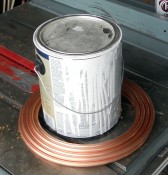
Find a form to wrap your coil around.Working with copper coil is tricky.  It kinks very easy.  Fortunately, the copper coil comes in a box already coiled.  This makes it much easier to coil around a round object without kinking it.  You’ll need to find a round form to wrap your coil around.  The form must be small enough so that it fits easily in your brew pot.  I used an old paint can for mine.

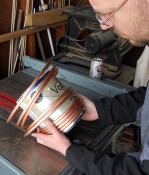
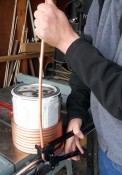
Wrap coil tightly around form.Put the form in the middle of the copper coil.  Starting from the bottom, hold the end and start pressing the coil against the form.  Twist the form as you work your way up.  You’ll end up with a nice tight coil around your form.

Nice tight fit without any kinks.From here, we need to bring each end up for the water inlet and outlet.  Many commercial wort chillers have the bottom edge going through the center of the coil.  You’re just asking for trouble trying to do this.  I found I got some really bad kinks, plus its difficult to work in that area.  Save yourself some headache, go on the outside.  It really doesn’t make any difference going through the center or the outside of the coil.

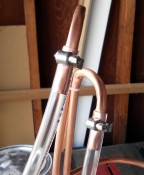
Bend coil's inlet/outlet to clear top of brewpot.I used a copper coil bending tool to make my bends.  I’d recommend using one.  Again, its really easy to kink the coil.  These tools equalize the pressure along the coil and make smooth bends.  I don’t think I used the tool I had very well as the bends aren’t as pretty as I had hoped, but at least it didn’t kink it.  Stretch the coil to form the chiller.Make sure the bottom is long enough to clear the top of your brew pot.  I also made a little s-hook on the end of the coil.  I mostly did this in case there’s a leak at the connection.  This  way water doesn’t drip into your brew pot.  Instead, it’ll run down the hose and safely away from your beer.  Lucky for me, the connection was very tight and didn’t have that problem.  Stretch out the coils a bit.  I used a small zip tie at the top to hold the inlet/outlet together.

Connect tubing to copper & secure with hose clamps.The hose connection couldn’t be easier.  First I cut the hose into 2 equal 5 foot sections.  Then, I slipped the 3/8″ tubing right over the end of the coil.  Then I used a a #4 hose clamp to really seal the deal.  The clamp makes a tight seal, and prevents the tube from coming off if the water pressure is too high.

The garden hose adapter was just as easy.  Just slip the tubing over the barbed end, and you’re done.  The barbed end makes a tight seal, so there’s no need for a hose clamp.  If you need the added versatility of connecting to a kitchen sink, you can buy a faucet-to-garden hose adapter for your faucet.

For the last 10 minutes of the boil, insert your wort chiller into the boiling wort.  This will sterilize the wort chiller.  When you’re ready to cool, hook up your garden hose to the wort chiller, turn on the water and watch the temperature drop!  I think my temps dropped to pitching temp within 15 minutes (we have cold ground water).  I couldn’t be happier with this DIY project.

Be sure to check out my buddy’s wort chiller project at Making Home Brew.  He also has very good instructions with lots of pictures.

Category: Home Brewing